Creating a Pull request on Github
What is a pull request?
A pull request (PR) is a method of submitting contributions to an open development project. It occurs when a developer asks for changes committed to an external repository to be considered for inclusion in a project's main repository after the peer review.
What you need
You will need to register an account on Github.
Please note that this tutorial might look long, but in reality it took at most 15 minutes to add a key and create the pull request.
I humbly hope that this tutorial will be of help to you.
In This example we are going to create a pull request to the following repository:
/UomAppCompetition2020
Step one, Fork the Branch
Navigate to the repository mentionned, and click on "Fork"
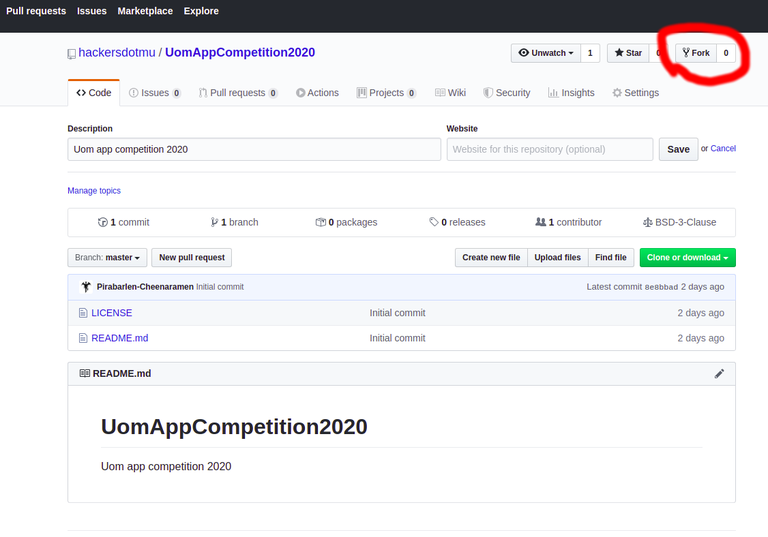
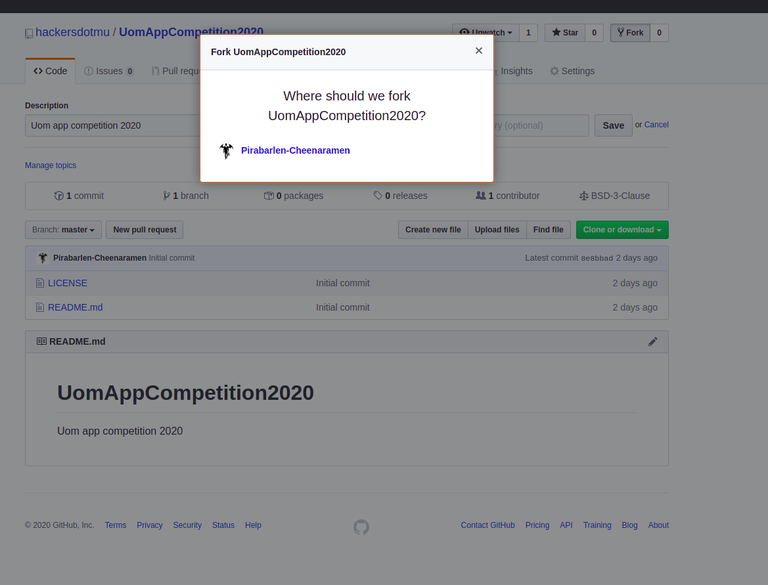
The following screen will appear, obviously with your username instead. Click on your user and the forking process will start.
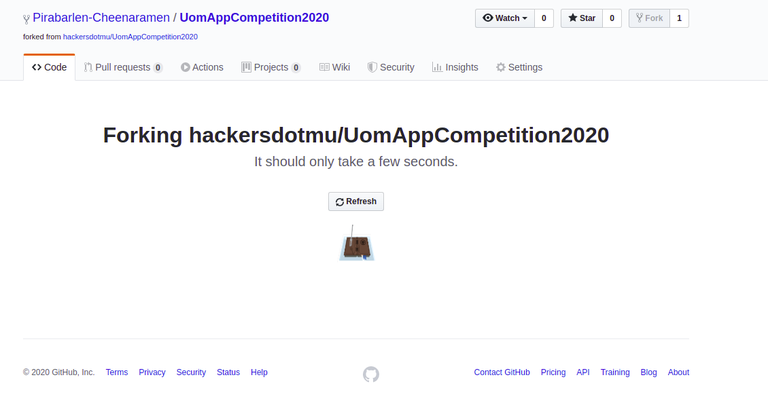
The forking process will look as follows, obviously here again it will be your-username/UomAppCompetition2020 that will be shown
Once forked, you should have a copy on your side as well.
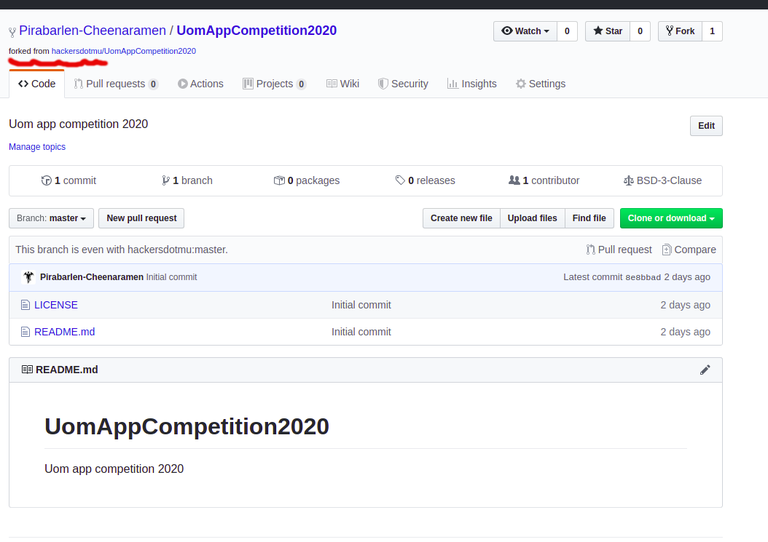
Next step, you want to clone your forked copy , we will clone with SSH, copy the content in the text box (git clone copied contents)
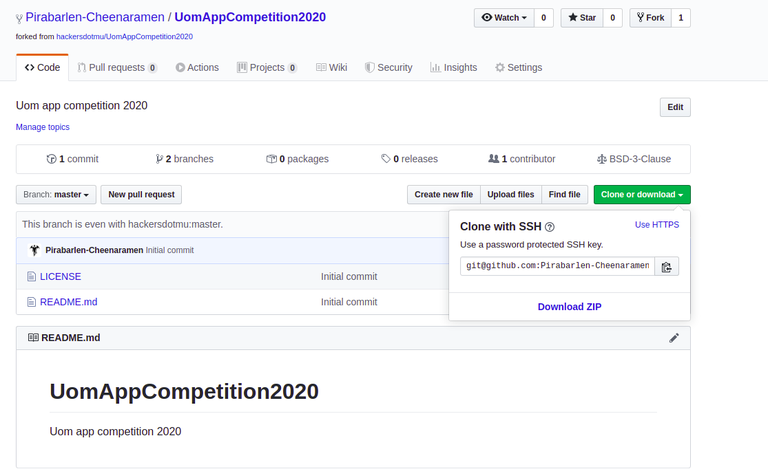
Open up your terminal, and start the cloning. You might get an error as follows if you do not have a proper ssh key defined on your github account
pirabarlen@thiruchendur:~/code/hmu$ git clone git@github.com:Pirabarlen-Cheenaramen/UomAppCompetition2020.git
Cloning into 'UomAppCompetition2020'...
git@github.com: Permission denied (publickey).
fatal: Could not read from remote repository.
Please make sure you have the correct access rights
and the repository exists.
How to add an ssh key to Github (Skip this step if you already have your keys on github)
First step, generate your key (don't worry this is not my real key)
pirabarlen@thiruchendur:~/code/hmu$ ssh-keygen -t rsa -b 4096 -C "youremail@example.com"
Generating public/private rsa key pair.
Enter file in which to save the key (/home/pirabarlen/.ssh/id_rsa): /home/pirabarlen/.ssh/id_rsa_pirabarlen
Enter passphrase (empty for no passphrase):
Enter same passphrase again:
Your identification has been saved in /home/pirabarlen/.ssh/id_rsa_pirabarlen.
Your public key has been saved in /home/pirabarlen/.ssh/id_rsa_pirabarlen.pub.
The key fingerprint is:
SHA256:D/FQ04l63fuV7S6iJqQmJkQfLjvFcEyvcrBJ6zLbbHQ youremail@example.com
The key's randomart image is:
+---[RSA 4096]----+
| oo . |
| . ...o |
| o . o. . . |
| = + . .+. . . |
| o @ o S.. .o|
| O E .o ..o|
| + B o . o.|
|oo* o o . . . . o|
|.=o+ o o.. . o.|
+----[SHA256]-----+
Since I generated my private in this file (/home/pirabarlen/.ssh/id_rsa_pirabarlen), my public key will be found in /home/pirabarlen/.ssh/id_rsa_pirabarlen.pub
After that, copy the content of your public key file so as you can add this on github
This can be done as follows (or simply open it up in your favourite editor and copy it.
pirabarlen@thiruchendur:~/code/hmu$ cat /home/pirabarlen/.ssh/id_rsa_pirabarlen.pub
ssh-rsa AAAAB3NzaC1yc2EAAAADAQABAAACAQCofGcEMtOaVm1tVQgo+DzB3U8yOK5Xni0CQ9Jk94CPlBU9mCg+Dp3r47hdPI6gn6cE7oFzQeGehvsvZwfcSWrWIPUNQTx1Nr+flVFMK5X10Ys9x7T7UbSKswrIIT5v4Re7ZyAHfGSKxH8rmdAzRVXZUFTPvYkrp1ogC1U3niWfhaChFRS5rFEQtEhMXCr09voNsL42ffYm7PDYcz3earqZ3Krz+aNss39KPvsTrul2brBzTivS/3BQ1QLCWHRq3UXzhQMqxhzh56MKsGlA91x3cgum1e8dD/amO1R8i3uKpiFdQGSqvh/L6uph7dbnzgR3sc6ptO+afzMzEYrQqUWpuJssDtxozFuT9LenHDyD1BnSWfbdID4l9Rvb5r6c0NbNzKXAGkv5riOOShAaLbFWiq1aHONt2zSD/IviOQc/8uuk0JQ8HRrM08tAsRFC/9RpyJIFoumGYCdxcv/Qo/mtOM1+pY430pyNcz9BAWj7W+CkAf9JLMJ/kWq9s0/y3B8z2wrZB3csg/ZKjyu78YQKaxglKb4uAnBgDeg22vQ2C4UcRtgTd1gvZ+TCSunAFGQVfN0pzf6Yj/bA5gRGOIAuRtTDP7mb1BDqAkzht4BAZws1HwRXaNiY1PTZpAkEfTMFLmEDqr98BEtryHeXxRJhTO0IJsy0SPbgPr9HGlvW9w== youremail@example.com
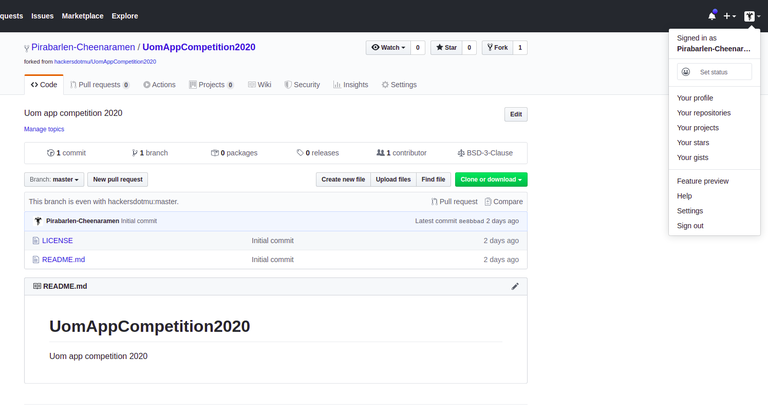
Go to settings->SSH and GPG keys, as show below
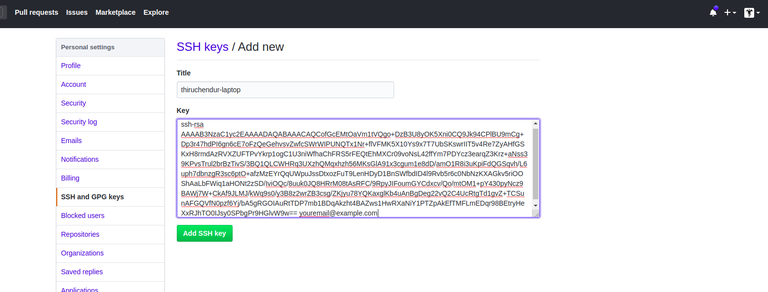
Write a small description and paste the public keys as follows
Cloning
You should now be able to Clone your branch
pirabarlen@thiruchendur:~/code/hmu$ git clone git@github.com:Pirabarlen-Cheenaramen/UomAppCompetition2020.git
Cloning into 'UomAppCompetition2020'...
remote: Enumerating objects: 4, done.
remote: Counting objects: 100% (4/4), done.
remote: Compressing objects: 100% (3/3), done.
Receiving objects: 100% (4/4), done.
remote: Total 4 (delta 0), reused 0 (delta 0), pack-reused 0
As you can see the project directory will be present
pirabarlen@thiruchendur:~/code/hmu$ ls -alht
total 28K
drwxr-xr-x 3 pirabarlen pirabarlen 4.0K Mar 5 17:46 UomAppCompetition2020
Create a branch, for the sake of this example, we are going to created a branch called team-hackers.mu, obviously you will have to call the branch according to your team name for example.
Create a branch
pirabarlen@thiruchendur:~/code/hmu/UomAppCompetition2020$ git branch team-hackers-mu
Checkout the branch you just created
Checkout the branch
pirabarlen@thiruchendur:~/code/hmu/UomAppCompetition2020$ git checkout team-hackers-mu
Switched to branch 'team-hackers-mu'
You can now add all your project file, for the sake of this example, I have created just one file called aloLeMorne.php
pirabarlen@thiruchendur:~/code/hmu/UomAppCompetition2020$ git status
On branch team-hackers-mu
Untracked files:
(use "git add <file>..." to include in what will be committed)
aloLeMorne.php
You can now add your file by doing git add, note you can also do git add * if there are many files.
pirabarlen@thiruchendur:~/code/hmu/UomAppCompetition2020$ git add aloLeMorne.php
Commit and push your changes
pirabarlen@thiruchendur:~/code/hmu/UomAppCompetition2020$ git commit -m "adding my alo le morne project file(s)"
[team-hackers-mu 76ece51] adding my alo le morne project file(s)
1 file changed, 4 insertions(+)
create mode 100644 aloLeMorne.php
pirabarlen@thiruchendur:~/code/hmu/UomAppCompetition2020$ git push
fatal: The current branch team-hackers-mu has no upstream branch.
To push the current branch and set the remote as upstream, use
git push --set-upstream origin team-hackers-mu
pirabarlen@thiruchendur:~/code/hmu/UomAppCompetition2020$ git push --set-upstream origin team-hackers-mu
Counting objects: 3, done.
Delta compression using up to 8 threads.
Compressing objects: 100% (2/2), done.
Writing objects: 100% (3/3), 375 bytes | 375.00 KiB/s, done.
Total 3 (delta 0), reused 0 (delta 0)
remote:
remote: Create a pull request for 'team-hackers-mu' on GitHub by visiting:
remote: https://github.com/Pirabarlen-Cheenaramen/UomAppCompetition2020/pull/new/team-hackers-mu
remote:
To github.com:Pirabarlen-Cheenaramen/UomAppCompetition2020.git
* [new branch] team-hackers-mu -> team-hackers-mu
Branch 'team-hackers-mu' set up to track remote branch 'team-hackers-mu' from 'origin'.
Use the link that you get from the push to make your pull request (open it up in your browser in which you are already logged in Github)
You will get something as follows, (You can choose to allow edits from the maintainers, if you believe you might need help with your pull request.
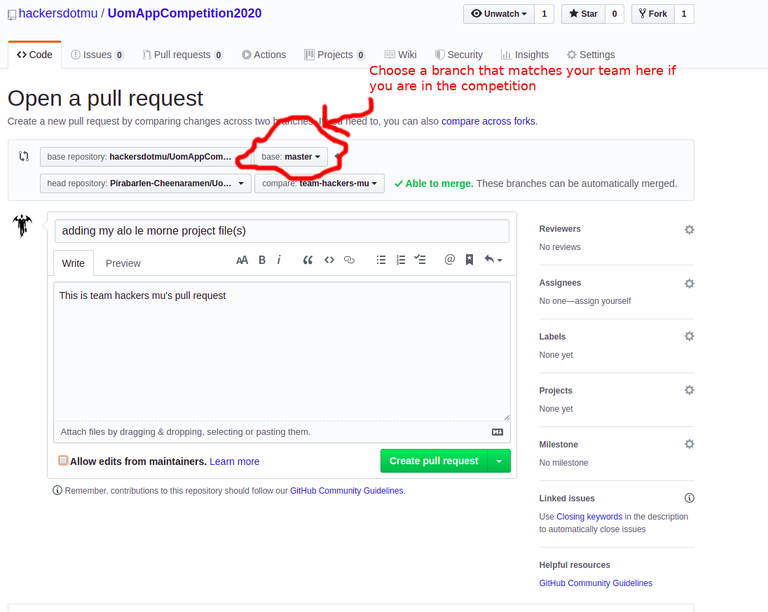
Then simply press on create pull request
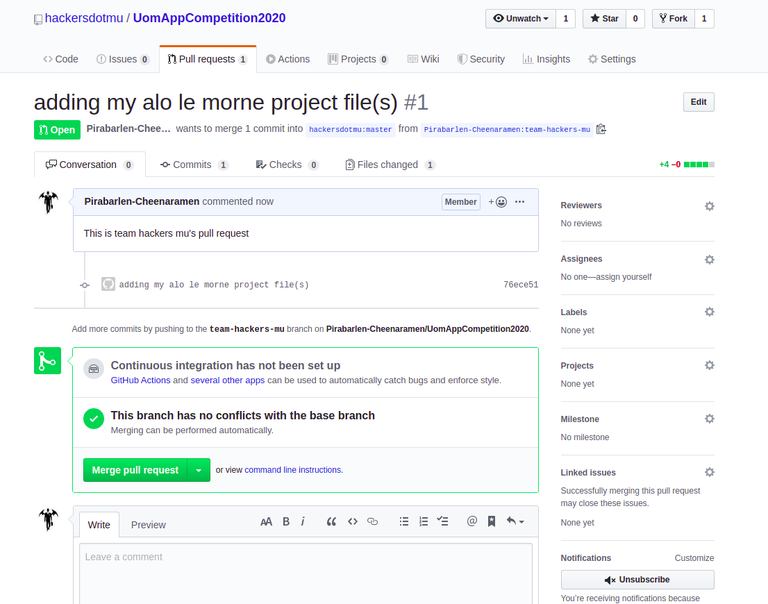
Tada, pull request created, note thati n my case, I made the pull request directly to master, in your case, for the sake of the competition, you will choose a branch that matches your team.
That's all folks, Hope this was not too complicated. If you use windows, then you probably are using putty, you will need to convert your keys first and add it up in putty. For the sake of the competition, you will also be provided with a dropbox in case you are having difficulties making the pull request. :) Try adding the pull request afterwards though if you were unable to add it during the competition, it will be good practice.
With this, I wish you all good luck. If you feel this tutorial was helpful, follow us on twitter @hackersdotmu, note that you can also contribute articles on hackers.mu if you wish to contribute some articles.
kudos to Yash, Yasir, Neeraj, Bunty & Trisha
Happy hacking!